In this workshop, we will create a new web3 onboarding experience that allows users to interact with smart contracts without ever creating their own wallet, signing a transaction, or paying gas fees. We will leverage EIP-4337 account abstraction mechanisms to do so. But before we get our hands dirty, let's have a look at what is this about.
This workshop is heavily inspired in @jarrodWatts tutorial so I suggest you take a look at what this amazing guy did!
My name is Giancarlo, I'm the founder of Webstudio.so and I love web3 no-code tools.
ERC-4337 sets a new standard for infrastructure that can enable :
This improvement has been in the works for a few years now, I suggest you read Vitalik’s post explaining it in detail.
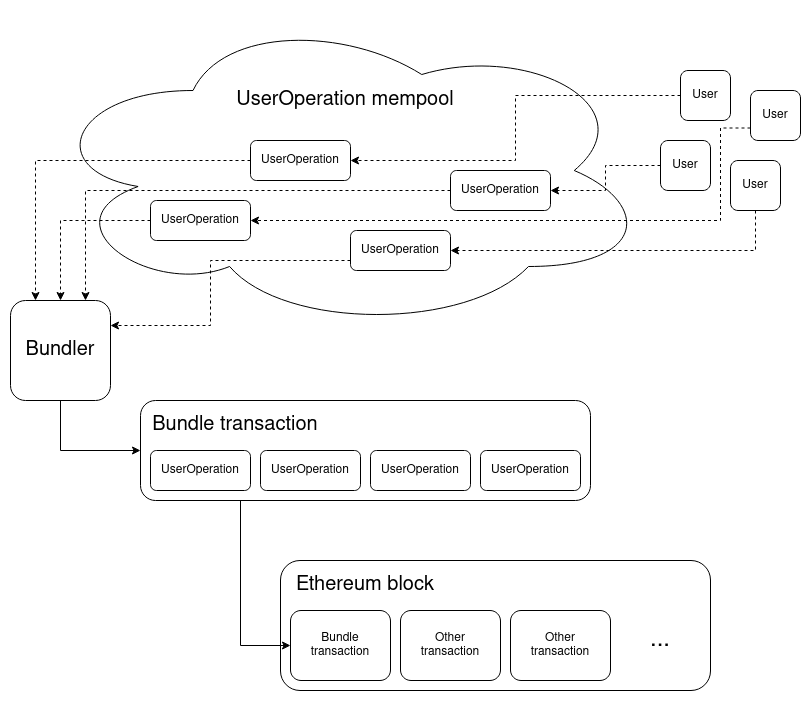
There are five major components to Account Abstraction under ERC-4337: UserOperation, Bundler, EntryPoint, Aggregators, and Paymasters. Here are the official specifications.
UserOperation: A new, special kind of operation that gets sent to a new mempool (a waiting zone to be picked up by nodes) called the “alt mempool” — a place where transactions go to be validated. This is an entirely separate mempool from the one used for processing transactions on the Ethereum mainnet. Firstly, you must understand that all transactions on the Ethereum network must be triggered and paid for by an Externally owned Account (EOA). Using a separate mempool lets users bypass these rules without affecting Ethereum’s underlying system.Bundlers: Nodes that bundle together UserOperations from the alt mempool, and send them to a Entry Point smart contract for them to be executed.Entry Point: A smart contract responsible for executing bundles of UserOperations that were submitted by bundlers.Aggregators: A smart contract responsible for executing bundles of UserOperations that were submitted by bundlers.Paymaster: A smart contract responsible for executing bundles of UserOperations that were submitted by bundlers.We will create a dApp for minting NFTs. This application will allow users to create local wallets from passwords and will not require paying for gas fees or signing the NFT claim action. We will leverage a ThirdWeb smart contract for Smart Wallets and the NFT as well as their SDK for this and we will code our own frontend using NextJS and Typescript. So, recap 1) smart wallet contract, 2) nft contract, 3) minting dApp.
Before we begin, make sure you have installed Metamask. You can download it from here.
Since we are going to be deploying contracts to Goerli Testnet, we will need funding from a testnet faucet. Head over to any faucet and request some GoerliETH to your wallet.
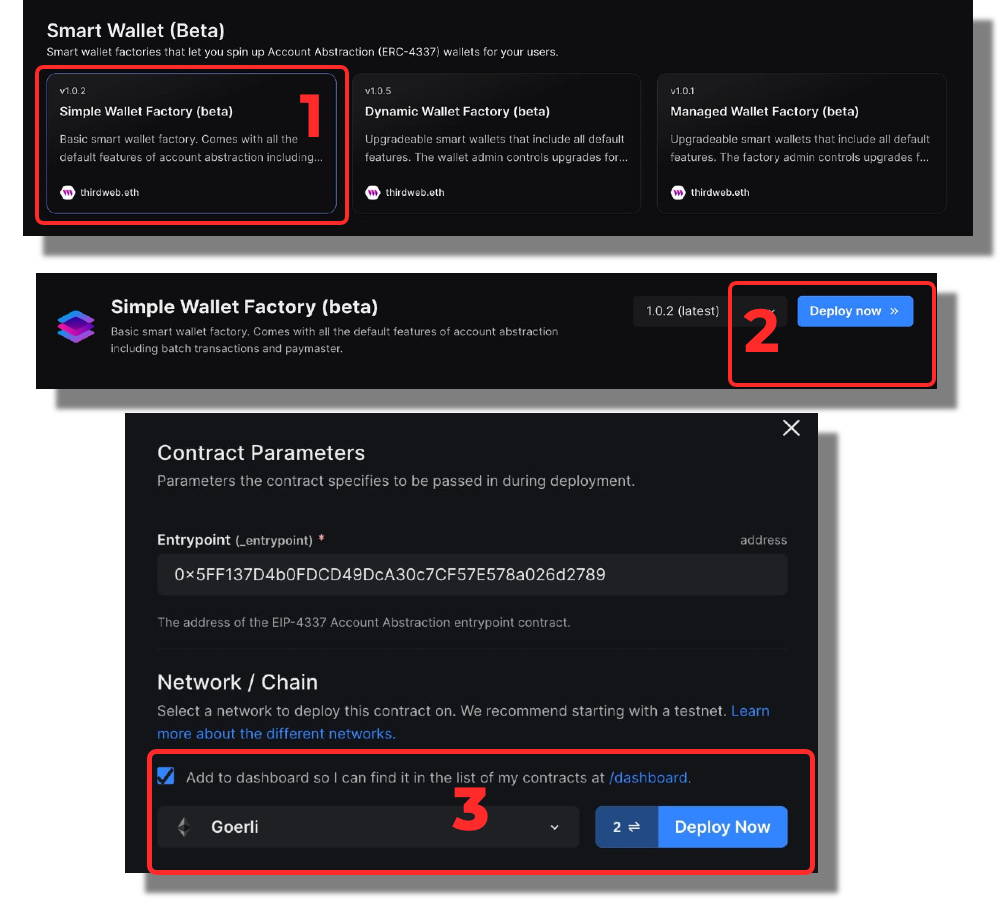
The first thing we'll do is create a factory contract, responsible for the creation of new smart wallet contracts. By using a factory, we can deploy new smart wallets for users on demand; simply by asking the factory to create a new one.
1. Go to ThirdWeb Explore page and scroll down to Smart Wallet (Beta).
2. Select Simple Wallet Factory smart contract, and click Deploy now.
3. Leave all default settings but change network to Goerli.
What we’re going to do with this factory is generate smart wallets for users under the hood. We’ll perform a two-step process to easily onboard users into the application:
This way, the user will interact with our application from their generated smart wallet. By using the signer of the generated EOA to approve transactions, we can hide any prompts or approvals from the user.
.png)
We will be launching our own NFT contract as well.
1. Go to ThirdWeb Explore page and scroll down to Popular.
2. Select NFT Drop contract and click Deploy now.
3. Fill in the Name, Description, Symbol and upload a square image. Remember to select Goerli network and click on Deploy now and make sure you have checked the option to add it to your dashboard!
Once the contract is deployed, we will be able to see it in our dashboard but we have a couple of more configurations to make. You see, we created a collection but now we need to prepare the metadata for the tokens that are going to be minted.
4. On the left menu, head over to "NFTs" and click on the button "Batch Upload" we will be uploading 100 metadata entries to create new NFTs under our collection. You can use our metadata file for this or create your own.
5. On the left menu, now go to "Claim Conditions" and click on "Add Phase" and make it public so we can all mint them.
Once you are done we are ready with our NFTs. We launched the collection contract, prepared the data for the next 100 mints and setup public the minting.
Let's get ready for some coding. We are going to be using NextJS and Typescript along the ThirdWeb SDK.
1. From the ThirdWeb console, request a new API Key. Make sure your wallet is connected to the Goerli network.
2. We'll be creating a Next.js + TypeScript application with the thirdweb React SDK installed to add our web3 features and capabilities. To get started, create a new project with the SDK pre-configured by running the following command from your terminal:
npx thirdweb create app --evm --next --ts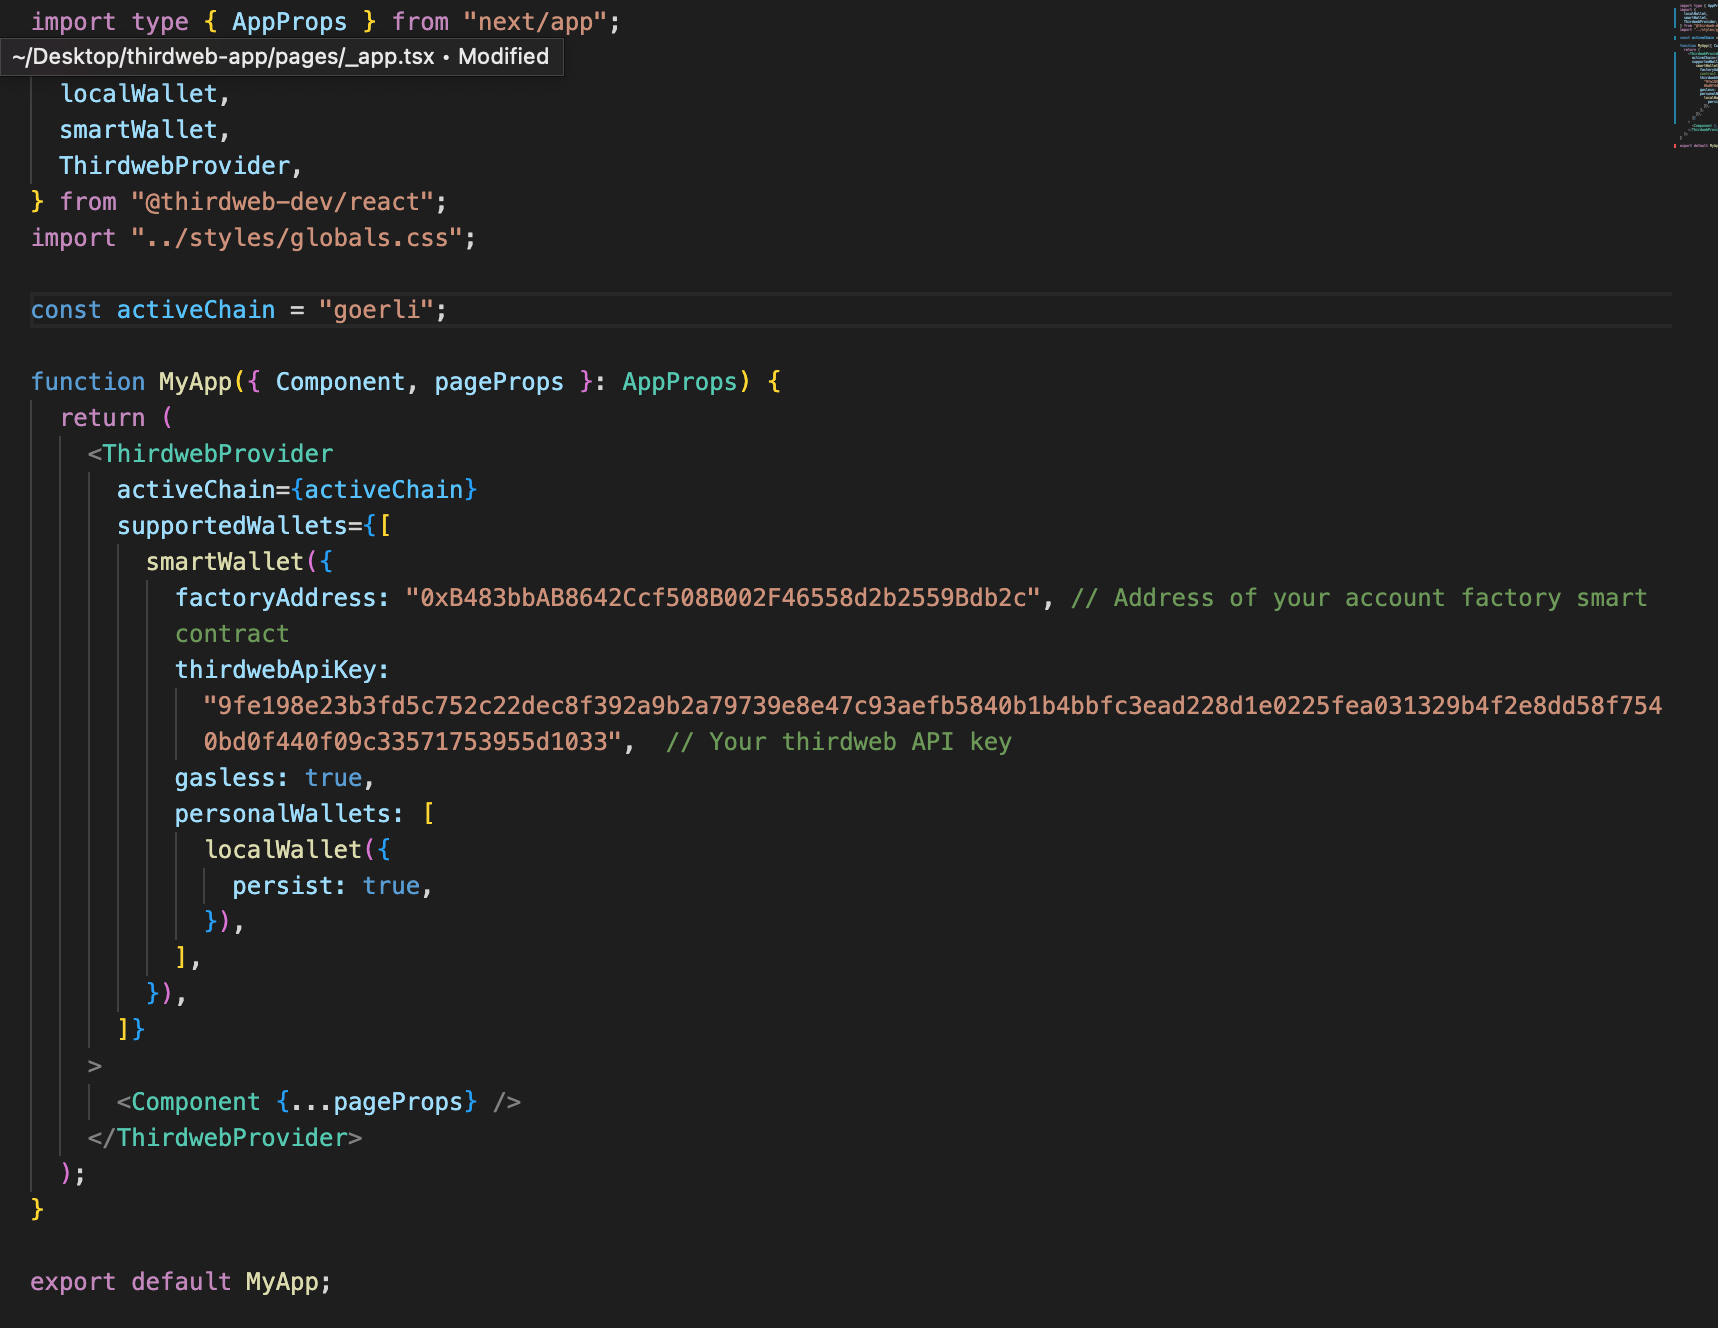
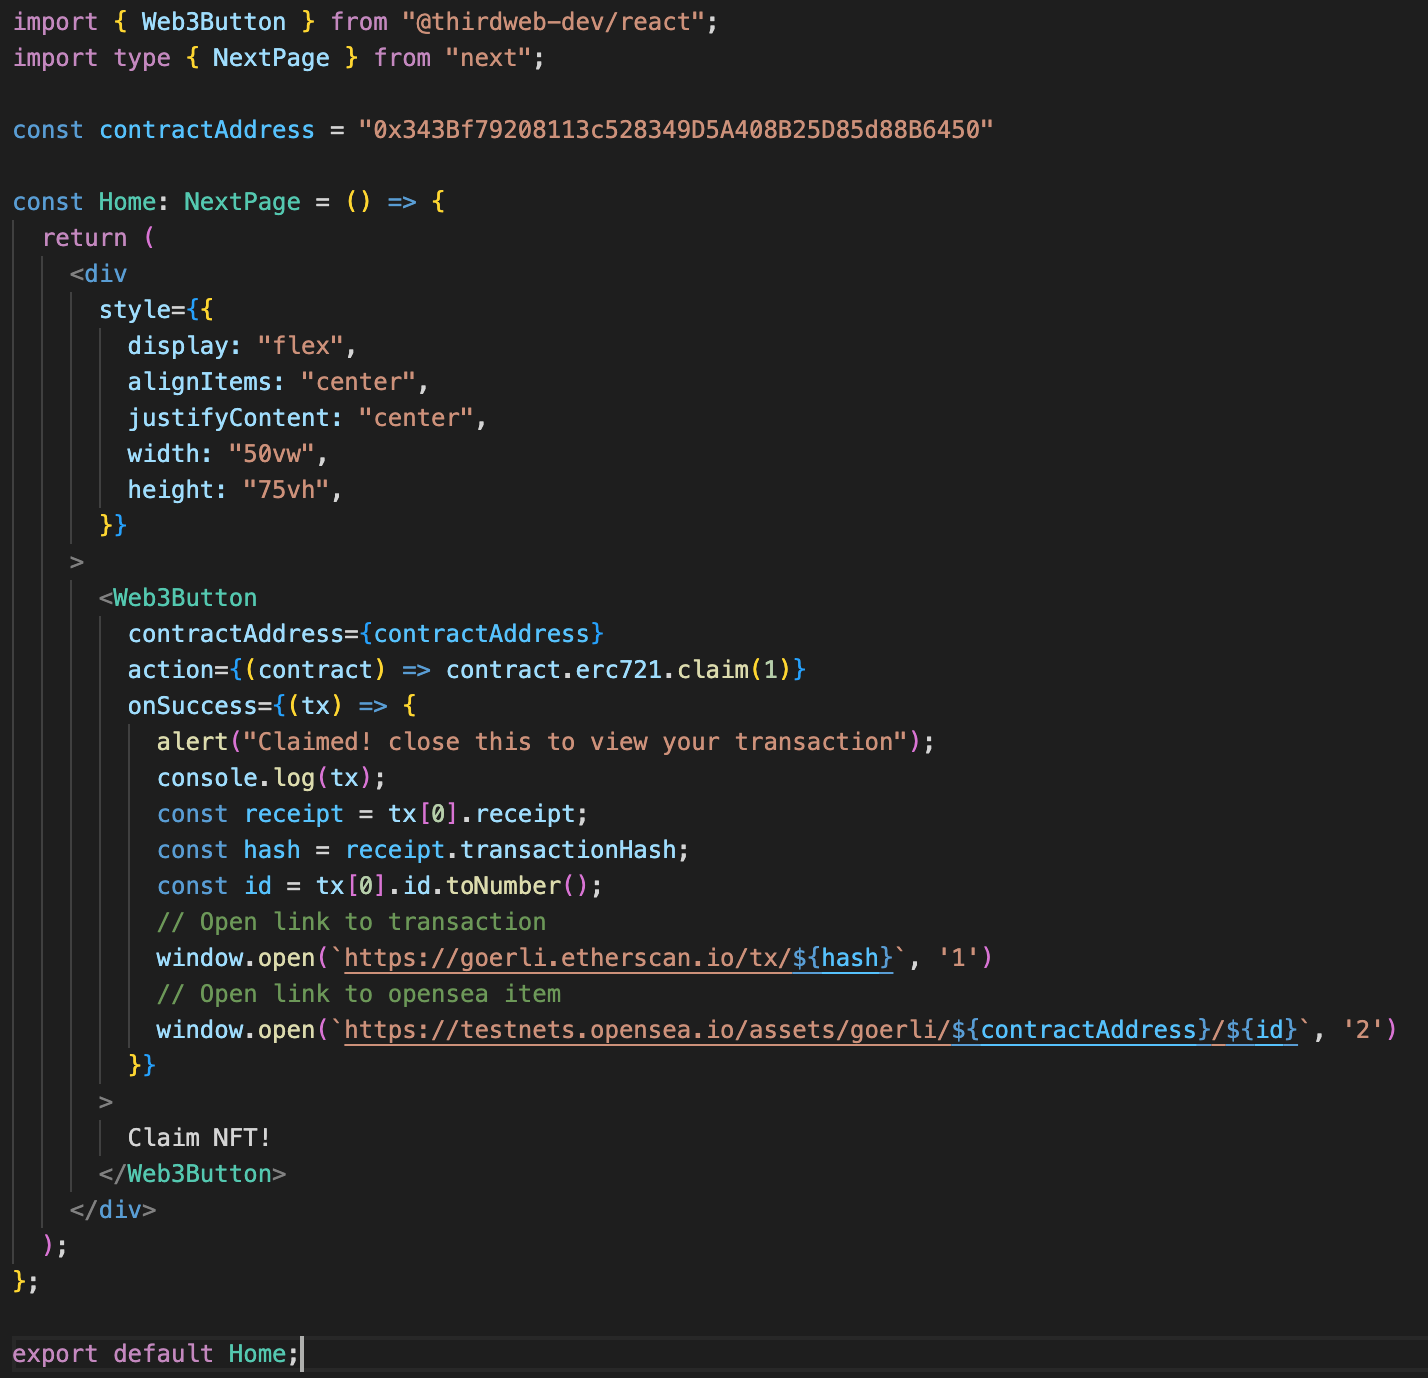
7. Open index.tsx file. We are going to delete most of the content in the component and replace it with Web3Button from ThirdWeb SDK. This button will allow us to authenticate and also execute the function method "claim".
8. We are going to define a constant "contractAddress" with the address of our NFT contract in the goerli testnet we created previously.
9. Upon success we will create an alert, print the transaction receipt and also open 2 new tabs in the browser, one for the transaction in the explorer and a second one to view our minted item through Opensea platform viewer.
If everything went according to plan, you should see your transaction in the explorer and your newly minted asset on Opensea!. You view the live app here and the repository in github.
https://blog.jarrodwatts.com/i-fixed-web3-onboarding
https://medium.com/infinitism/erc-4337-account-abstraction-without-ethereum-protocol-changes-d75c9d94dc4a
https://eips.ethereum.org/EIPS/eip-4337
https://thirdweb.com/explore
https://webstudio.so